This blog post on Ohm's Law is an excerpt from Level A of our Intro to Robotics program. Level A covers building circuits, using a Raspberry Pi, and writing common code commands in Python. It contains 18 lessons including 70+ videos and 45 projects and activities. Sample lessons and a full scope and sequence for Level A can be found here.
The voltage, current, and resistance in a circuit are mathematically related. Ohm’s Law can be used to determine the voltage, resistance, or current of any component in a circuit. If you have two out of the three values, you can calculate the third using:
V = I x R or Voltage = Current x Resistance
To use the formula, ensure that you convert all values to the following units:
- V is for volts
- R is for ohms
- I is in amps -- Note: This is the most problematic unit as current is often in milliamps and must be converted before using it for Ohm’s Law, so 10mA would become .010 amps in the formula
What if you need to solve for current or resistance? The formula can be manipulated to solve for these:
I = V / R or R = V / I
In the future when you design your own circuits, this formula will come in handy when selecting a resistor value to help limit current for the electronic components in your circuit.
Ohm's Law Calculation Example
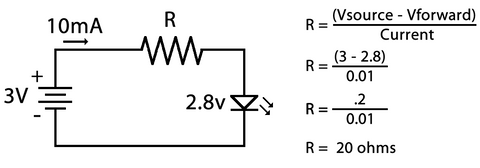
Let’s say you have an LED with a Vf of 2.8V, with a current limit of 10mA, and a supply voltage of 3-volts. The formula you would use is resistance equals the supply voltage minus the LED’s forward voltage divided by the desired current in amps.

Start by subtracting the LED Vf of 2.8 from the supply voltage of 3, and dividing that by 10mA or .010. This leaves you with .2 divided by .01 which equals 20 or 20-ohms. This means that with a supply voltage of 3-volts and an LED with a Vf of 2.8V, you would need a 20-ohm resistor to limit the current through the LED to 10mA.
10mA is well below the limit of 20mA, however LEDs need very little current to turn on so it’s best to go as low as possible. Later in this course, you will power the breadboard using the Raspberry Pi. Since the Raspberry Pi is a small computer, it can only output a limited amount of current, so keeping the LED current to a minimum is a good idea.
Use Ohm’s Law to determine how much current the LED is allowed when we use a 220-ohm resistor and a 3-volt supply.

Using this formula, a 220-ohm limits the LED current to .0009 amps or .9mA. Comparatively, a 20-ohm resistor would limit the LED current to .010 amps or 10mA.
This means that if your voltage source was only able to supply 10mA of current, you could power a single LED with a 20-ohm resistor or you could power 11 LEDs using 220-ohm resistors.
There is not much LED brightness difference between the two, so limiting the current as much as possible is the better option, especially when powering LEDs using the Raspberry Pi.

As you can see from this photo, the 20-ohm resistor powering the LED at 10mA is only marginally brighter than the 220-ohm resistor powering the LED at .9mA. Unless your application requires an extremely bright LED that needs a lot of current, you can normally get away with powering LEDs using very little current.
Don’t worry if you don’t quite understand the math. When working with projects you find in the Intro to Robotics course or for most projects you find online, the resistor to use will already be specified. Rather, the goal is for you to understand that voltage, current, and resistance are mathematically related, and that the equation can be used when designing circuits.
This blog post on Ohm's Law is an excerpt from Level A of our Intro to Robotics program. Level A covers building circuits, using a Raspberry Pi, and writing common code commands in Python. It contains 18 lessons including 70+ videos and 45 projects and activities. Sample lessons and a full scope and sequence for Level A can be found here.
