This blog post on adding audio to your projects is an excerpt from Lesson C-6 of our Intro to Robotics program. Level C is the third level in Intro to Robotics and covers working with complex electrical components, writing advanced-level code commands in Python, and using a Raspberry Pi to control your electronics projects with the code you write. It contains 18 lessons including 30+ videos and 54 projects and activities. Sample lessons and a full scope and sequence for Level C can be found here.
Audio can add another level to a project, whether it's playing audio through the speaker of a Halloween decoration, or playing your own recorded voice through a mobile robot. Lesson C-6 of our Intro to Robotics program will teach you about the audio capabilities of the Raspberry Pi and how they can be used to add audio to a project.
Amplifiers
Back in Level B, you learned about using different pulse width modulation (PWM) frequencies to create different sounds with a Piezo-electric speaker. In addition to frequency, audio signals have another very important attribute called amplitude. Amplitude is the measurement of how large, or how many volts tall an audio signal is, and this value determines how much "work" the signal can do in driving a speaker.
The device used to increase the amplitude of a signal is called an amplifier. An amplifier takes the input of a small signal, and outputs a much larger signal that is capable of driving larger speakers.
The amplifier included in the Intro to Robotics Level C kit is built around the PAM8302A chipset. It's capable of delivering 2.5 Watts of power into a speaker.

Audio Output Hardware
The Raspberry Pi model 3B from your kit includes a 3.5mm jack that can be used to output audio signals. This type of connection is commonly referred to as a "headphone" jack as it's normally used to connect headphones to a device. This port is located between the Ethernet and HDMI connectors on the Pi.
The Pi can also output audio using the HDMI cable (included in the Level C kit). This can be useful if you have a TV or computer monitor with built-in speakers and an HDMI connection. Running audio over the HDMI connection allows you to run both audio and video in a single cable, eliminating the need for a separate, dedicated audio cable.

The Level C kit also includes a speaker that will be attached to the amplifier during the activities portion of Lesson C-6.

During the activities portion of Lesson C-6, we teach you to do the following:
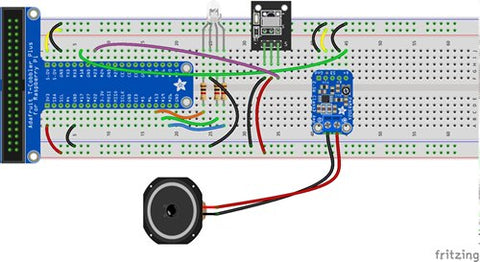
- Build a circuit that will allow for recording and playback of audio files, by adding an amplifier, speaker, USB audio device, and microphone to the circuit.
- Create a small Python program to test the audio output circuit and speaker.
- Record an audio file using the USB audio device and microphone, and play that recorded file back using the amplifier and speaker.
- Modify a program you will have written in Lesson C-2 to add the ability to play your voice file through the speaker when button four is pressed.
Later in Level D, you take the skills you've learned working with the amplifier and speaker and add those audio elements to your robot.

This blog post on adding audio to your projects is an excerpt from Lesson C-6 of our Intro to Robotics program. Level C is the third level in Intro to Robotics and covers working with complex electrical components, writing advanced-level code commands in Python, and using a Raspberry Pi to control your electronics projects with the code you write. It contains 18 lessons including 30+ videos and 54 projects and activities. Sample lessons and a full scope and sequence for Level C can be found here.
